tinker cad lesson continued (5th Oct 2015)
I visited tinker cad and did lesson 1,2,3, 4 and 5
I went to lesson 1
1) we started simple
2) we just had to drag a shape from a grid to another place in the grid
I went to lesson 2
1) in lesson 2 I learnt to use the arrow keys
2) I learnt to move the grid around
3) and I also learnt how to see what is on the other side of the curtain
I went to lesson 3
1) for this one there was a shape of a spanner on the grid
2) then I dragged a hexagonal prism on to the shape
3) then I clicked the group button
4) my shape was done and I made a spanner that had a hole
i went onto lesson 4 and followed the steps
1) drag and drop a cylinder onto the grid
2) drop another cylinder next to it
3) the scale the second cylinder to 15mm
4) next to the 1st cylinder i copied and pasted another one and scaled it to 10mm
next I went to lesson 5
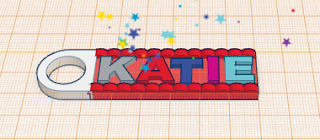
1)for this one we made a key ring
2) I dragged and dropped the alphabets onto the red base
3)I used my arrow keys to make it more precise
4) I altered the shape of the red base to make it the size of the name
5) I deleted the extra letters on the page and it was done


No comments:
Post a Comment